Many of us use Microsoft Word every day, navigating and utilizing the tool in the same way we did in 1999… minus the cute paper clip guy – we sure miss that guy!
The Saffire Team has compiled a list of some of the more unique tips and tricks that we have picked up over the years. We recommend you open up Word when reading through the list in order to try out some of our tricks!
1. Configure Paste Options
Need to cut and paste from a bunch of documents? It can become a formatting nightmare! Word “tries” to be helpful when copied text is pasted into a document by automatically retaining the source formatting, while providing the option to change the text to match the formatting of the current document.
To avoid having to choose formatting option every time text is pasted, click File, followed by Options and then click on Advanced. In the ‘Cut, copy and paste’ heading, you can use the first four drop-down menus to set a default setting for format pasting.
While configuring these options in Word, uncheck the box labelled ‘Show Paste Options Buttons’ to prevent the formatting options pop-up window from being displayed in the future.
2. Show and Hide the Toolbar:
Have you ever been typing away and all of a sudden a random mouse click hid your entire toolbar? It’s a simple fix, but in the moment it can be really frustrating!
To get the toolbar back, double-click one of the tabs at the top of the ribbon to toggle the toolbar on and off. Also, you can use the keyboard shortcut – by simply pressing [Ctrl]+[F1].
If you want to hide it, click the up arrow icon on the far right side of the toolbar.
3. Utilize the Quick Access Toolbar:
An underutilized tool that can save a ton of time! The Quick Access Toolbar (QAT) is a small, customizable toolbar that exposes a set of commands that are specified by the application or selected by the user.
The following screenshot shows where QAT can be found and edited.
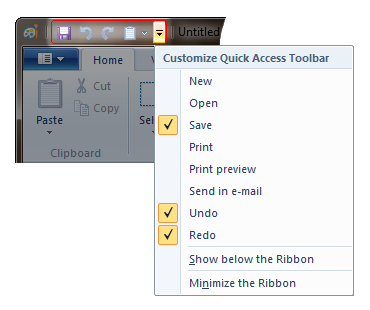
You can pick from a list of 20 shortcuts like print, insert hyperlink, add table, etc.
One of the most necessary shortcuts to add is Print. This will immediately send your document to the printer.
4. Remove Formatting:
Your document can get really messy when dealing with varying fonts. If text has been formatted and you change your mind about how it should appear, highlight the section of text, and press [Ctrl]+[Space] and it will clear all formatting!
5. Adjust Font Spacing in Headings:
A fairly simple, yet forgotten feature is to adjust text spacing. Text space can be used to help ensure that a heading fits on a single line, rather than wrapping onto a second, or can be expanded to reduce the amount of white space in a line.
Highlight a line of text, right click and select ‘Font’ from the context menu. Then click ‘Advanced’ and ‘Spacing’. The ‘Spacing’ section has a drop-down where you will choose if you want to condense or expand the spacing in-between the letters. Use the up and down arrows in the ‘Spacing’ section to expand or compress it.
6. Compare Documents
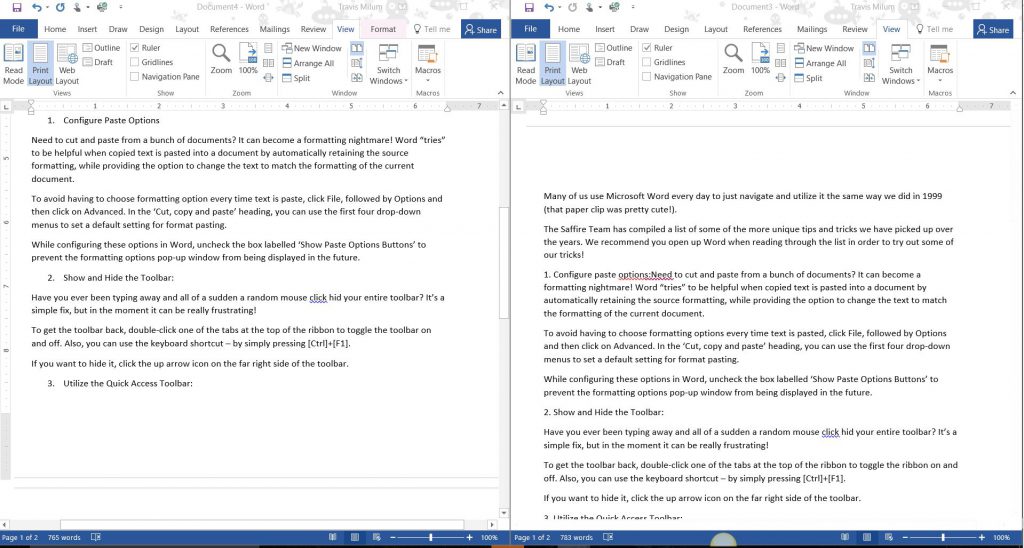
There are various reasons why you might want to compare two documents. Word provides the option to open two files side by side for this very purpose. However, if you’re using a monitor in portrait mode, document comparison is less useful than having one document displayed above the other.
Open the documents you want to compare and click the ‘View’ tab on the toolbar. Click ‘View Side by Side’ button and then click ‘Arrange All’. Press ‘Synchronous Scrolling’ and you can scroll through both of your documents at the same time.
7. Paste Text with the Spike:
While the Clipboard provides a useful way to copy and move text around a Word document, there’s a little-known feature called “the Spike” that provides an alternative. Text that is added to Spike is cut from the document and there is no limit to the number of entries that can be added, meaning you can jump around the document cutting certain paragraphs, words or sentences and adding them to the Spike. You can then easily paste all of the cut text and easily paste it in the area of preference.
To add text to the Spike, highlight it and press {Ctrl]+[F3] simultaneously – this can be repeated as many times as required. To paste the contents of the Spike back into a document, you just need to press [Ctrl]+[Shift]+[F3].